I solved this challenge during the 2026 ph0wn conference’s CTF warmup (first day). The CTFd instance was available at https://ph0wn.shl.events/challenges and it contained challenges from previous years. This challenge - pico-pcb-2 - was originally released in the 2024 ph0wn CTF.
Apparently, during the 2024 CTF the challenge was a two-parter, where solving the first part gave you access to the firmware dump which was necessary for the second part. From my point of view, the challenge came with a small device and a firmware dump.
I don’t have any experience with hardware challenges except for the solving one in BlackAlps 2026 with a lot of “I pray this does what I think it does” and lots of help from teammates.
Forewarning: The challenge is easy.
Getting to the static analysis
I don’t really know how to analyze firmware so I tried to use binwalk since I often see it being mentioned.
$ binwalk firmware.0.15.uf2
Analyzed 1 file for 85 file signatures (187 magic patterns) in 8.0 milliseconds
But was confused by the fact that binwalk said it analized the thing but provided no analysis output. Passing binwalk -e also gave nothing useful. Luckily the trusty file command sheds some light on the firmware:
$ file firmware.0.15.uf2
firmware.0.15.uf2: UF2 firmware image, family Raspberry Pi RP2040, base address 0x10000000, 150 total blocks
Looking up “unpack UF2 firmware” directly leads to uf2utils:
$ uv tool install git+https://github.com/makerdiary/uf2utils.git@main
$ uf2conv firmware.0.15.uf2 --convert --output firmware.bin
Learning my lesson, I run file first:
$ file firmware.bin
firmware.bin: Raspberry Pi RP2040 firmware, initial SP at 0x20042000, reset at 0x100001f6, NMI at 0x100001c2, HardFault at 0x100001c4, SVCall at 0x100001c6, PendSV at 0x100001c8, with binary_info
At this point I was quite lost, being unsure exactly what a “firmware” file is. Is there another unpacking step? Can I get an ELF somehow? Can I put it in a decompiler? How do I know what is code and what is data?
I was hitting my head against the wall for a bit, here is what I think you are intended to do in hindsight.
Lookup “Raspberry Pi RP2040 datasheet” online to find the datasheet pdf then you scan the Table of Contents looking for “Memory Map” or “Address Map”, in our case we find section “2.2 Address Map”, giving us this crucial table:
 The most important thing is that the XIP (Execute In Place) segment starts at 0x10000000, and that SRAM starts at 0x20000000. By scrolling down a bit we find that SRAM ends at 0x20042000. Hey remember what
 file told us? “initial SP at 0x20042000” - i.e. the SRAM contains our stack (and data).
Next I want to know what CPU architecture this thing is running. The very first page of the datasheet says “Dual ARM Cortex-M0+”. Looking at the wiki page for the CPU reveals it’s running ARMv6-M. Looking up “ARMv6-M” tells us that this is a 32-bit instruction set.
Now we can finally open IDA.
- Open
firmware.binin IDA - Don’t trust its MetaPC magic, change the architecture to “ARM little endian” (I just assumed it was little endian and it was correct)
- Now you’ll get a menu about setting up sections, you can do this now or just click OK and do it in the next step. Let’s assume you just clicked OK.
- IDA will ask you if you want 64-bit code, we know our thing runs only 32-bit instructions so No.
- You get a thumb mode popup - Ok
- You get a “IDA can’t find the entrypoint popup” - Ok
First thing’s first, all our jumps and branches will be messed up since they have hardcoded addresses. Go to Edit > Segments > Rebase Program. For the value we set 0x10000000 which is the XIP base address.
Phew, noww the decompilation looks a little bit human (if you don’t do this step, you’re not going to have a lot of fun later on). Though we still have lots of red like this:
 What’s the issue? Those are stack and data accesses that IDA can’t resolve because it doesn’t see anything mapped at those addresses. Now we do Edit > Segments > Create Segment, and we set the values for our SRAM:
- Segment Name: SRAM
- Start address: 0x20000000
- End address: 0x20042000
- Tick the “sparse memory” box to reduce the
.i64file size.
Press OK and F5. And now, we finally have something a person can look at:
 Now it is just “normal” stripped rev i.e. a lot of looking at the Strings menu (Views > Open subviews > Strings).
Before that though, remember that we also got the actual device.
Dynamic analysis
The piece of hardware is a small board with a few chips and a USB thingy sticking out of it.
Again, very lost on how I’m actually supposed to communicate with this thing, but after playing around and asking my teammates I figure this is the intended workflow.
- Unplug the USB from my laptop
- Plug the USB back into my laptop
- Check
sudo dmesgoutput and see what the filename of the device in/dev/is - Run
screen /dev/<filename_from_dmesg> <guess_a_baudrate>
In my case it was screen /dev/ttyUSB0 115200. This now allows us to send messages back-and-forth with the device. I unfortunately don’t have a picture to show you because I don’t have the device with me anymore, but it is very like a normal userspace pwn challenge. Interestingly there is no newlines buffering, as soon as you press a key it gets sent (though I suppose this may depend on your USB serial client).
Anyway, playing around with it a bit gets us to a “Enter the password” prompt, with no obvious way for us to know the password, this seems like a classic rev challenge.
A classic rev challenge
Here are the strings of the firmware:
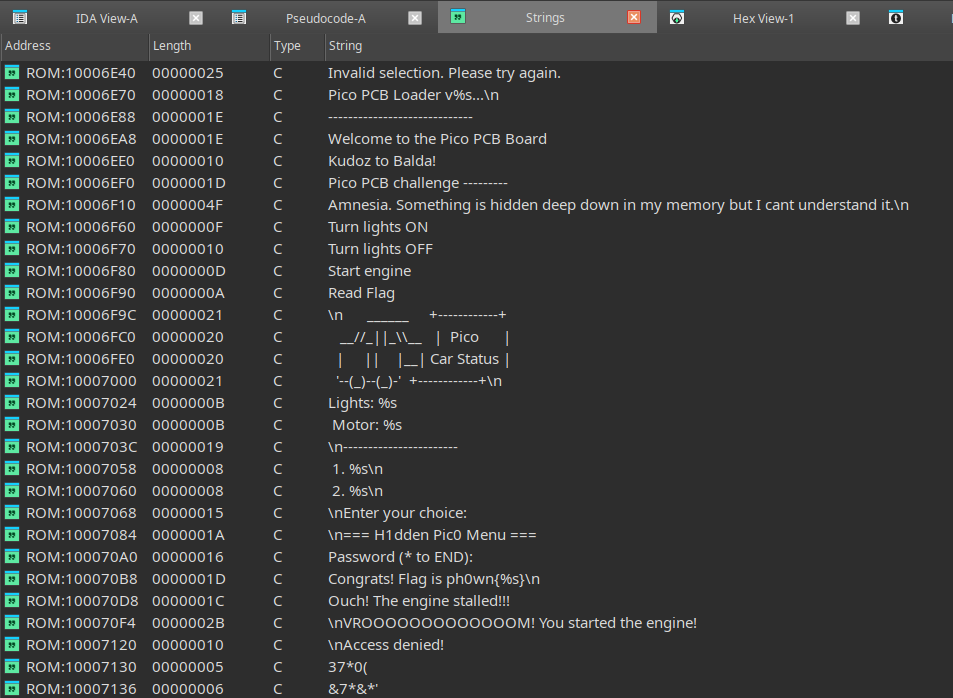 Clearly interesting is the
 "Flag is ph0wn{%s}\n" one as that seems to be the win function. Following the cross-reference, it leads us to this function:
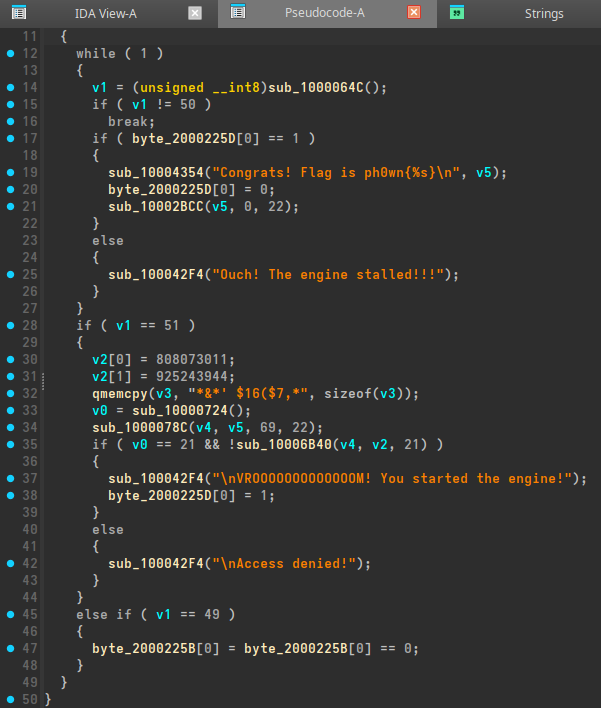 which, after a bit of reversing, looks like this:
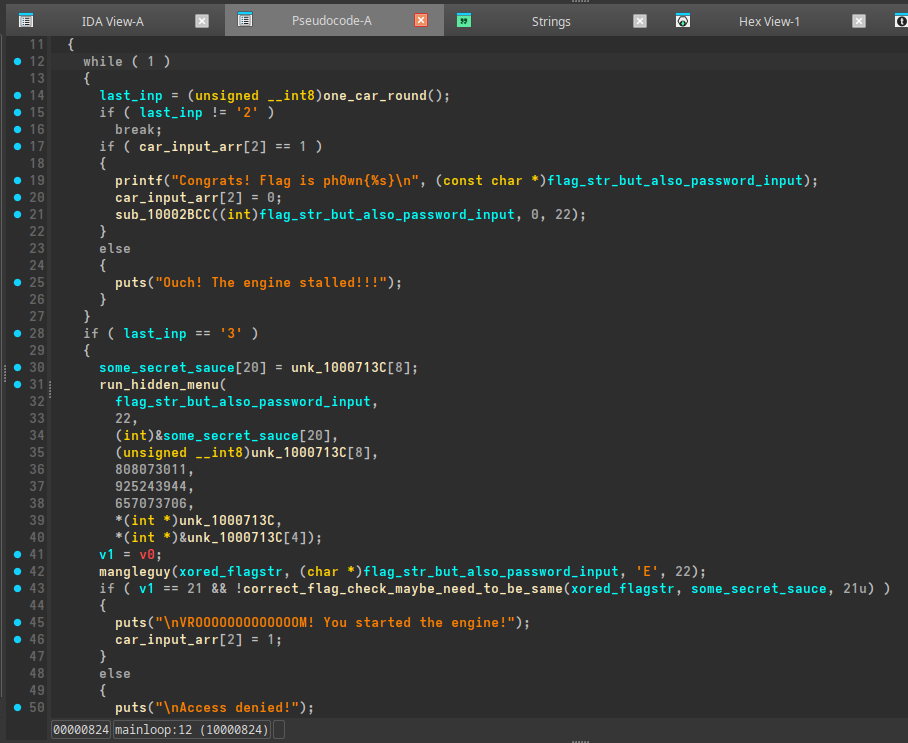 Where
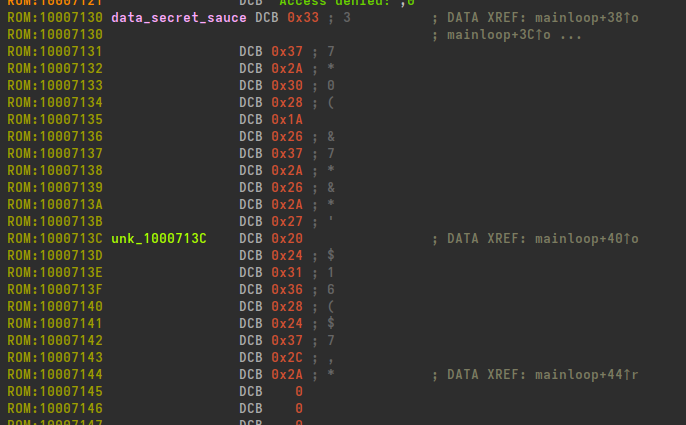
Where mangleguy is just a simple per-character-xor. We do a bit of assembly reading and pointer following to figure out that some_secret_sauce gets these contents:
 Which leads us to our solve script:
arr = [
    0x33, 0x37, 0x2A, 0x30, 0x28,
    0x1A, 0x26, 0x37, 0x2A, 0x26,
    0x2A, 0x27, 0x20, 0x24, 0x31,
    0x36, 0x28, 0x24, 0x37, 0x2C,
    0x2A,
]

print("len: ", len(arr))

for num in arr:
    corr = num ^ ord("E")
    print(chr(corr), end="")
Running:
$ python unmangle.py
len:  21
vroum_crocobeatsmario
When we pass vroum_crocobeatsmario in as the password to the device, it spits ph0wn{vroum_crocobeatsmario} back out, verifying that the flag is correct.
Yay!
Conclusion
It is worth to take the effort to figure out the memory map of the device. Even if it is not publicly available, it should not be too hard to infer by looking at the red MEMORY[0x20000800] lines.
And telling IDA about the maps and the correct base makes the challenge go from “intuit the flag by looking at the hexdump of something that is maybe assembly” to “baby rev”.
All in all, figuring this out was very fun, and I hope to play with hardware more in the future!